Temenos Lifecycle Management Suite - Collection Product Guide
Configuration Manager
| Administrator Guide > Configuration Manager |
The Configuration Manager allows an institution to configure system settings in one Lifecycle Management Suite system (i.e. a source system) and then transfer those settings to another Lifecycle Management Suite system (i.e. a target system). Transferring settings from one environment to another in just a few clicks saves time and prevents errors from occurring when trying to rebuild configurations from scratch.
 |
Configuration Manager is automatically included in versions and higher of the Lifecycle Management Suite; therefore, no additional activation steps are required. |
The Configuration Manager process is bi-directional, meaning that settings can be sent from a test system into a production system and can also be sent from a production system back into a test system. In order for this to work, the source system and the target system must be on the same version of the Lifecycle Management Suite. The process that gathers configuration information from the source system is called an Export. The process that adds configurations to the target system is called an Import. Both the Export and Import are accessed through System Management.
Most of the configurable items available in System Management can be imported and exported through Configuration Manager. An item is a piece of Lifecycle Management Suite functionality that is available for export. When selected for export, these items have related items that must also be exported in order for the selected item to function properly in the target environment. For example, if a workflow is selected to export, all of its workflow steps and associations (mappings to users, groups, etc.) are also included in the export.
Please see the Relationship Mapping section of this topic for a complete list of available items to import/export and their related items.
|
The following items are not available for import and export using Configuration Manager:
|
 |
Data cannot be exported using Configuration Manager. |
The Configuration Manager topic includes the following information to assist administrators in using Configuration Manger:
In order for an institution to use the Configuration Manager feature, the following requirements must be met:
|
It is recommended that databases in the source and target environments are in sync (target environment restored to the source environment) prior to any Configuration Manager functionality being used. A copy of the target database should also be taken prior to the import process. Failure to complete these steps may result in issues with naming conflicts during the import. |
|
In order for Configuration Manager to work, collation must be the same in both the source and target environments' server and database. If collation is not the same, an error is received upon import of the package in the target environment, preventing the import from completing successfully. |
The following is an example of how an institution can use Configuration Manager to transfer system settings from one environment to another environment.
Lois is a manager at Quahog Financial. The financial institution has recently installed Lifecycle Management Suite version 15.05 in their test environment. Lois has been eagerly configuring the new system to suit her institution’s business needs. Once she is done configuring and testing version 15.05, her IT resource loads the same release in production.
Lois is now dreading the thought of having to reconfigure her new production system to match her test system, until she remembers that she can use Configuration Manager to transfer her settings in a few simple clicks.
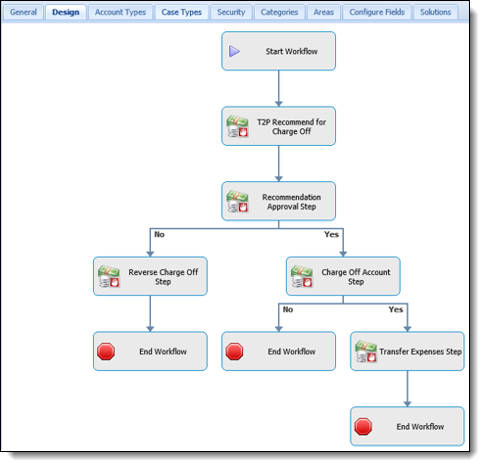
She wants to first transfer a rather complex Charge Off workflow, shown below.
On her test system, Lois browses to System Management > Configurations > Export Configurations and clicks  .
.
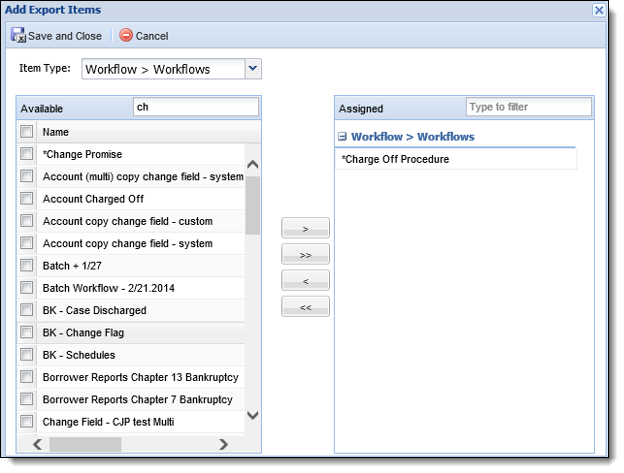
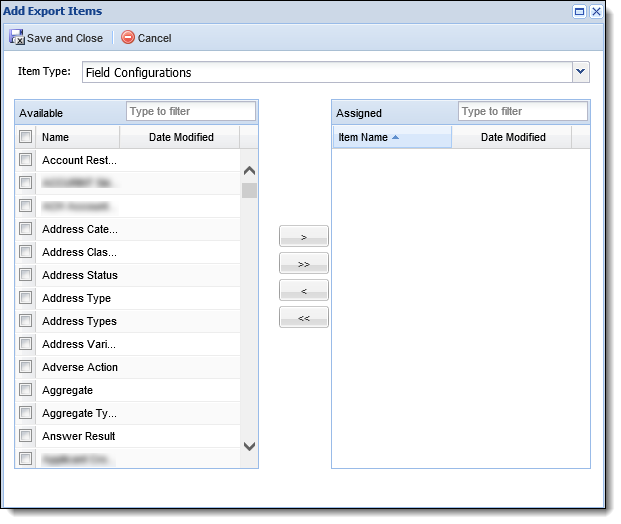
She selects Workflows from the Item Type drop-down and finds the Charge Off Workflow in the list of Available workflows. She uses the arrows on the screen to move the workflow to the Assigned list and then clicks  .
.
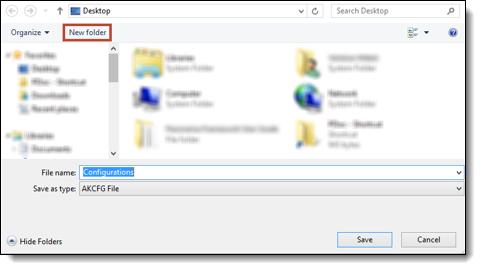
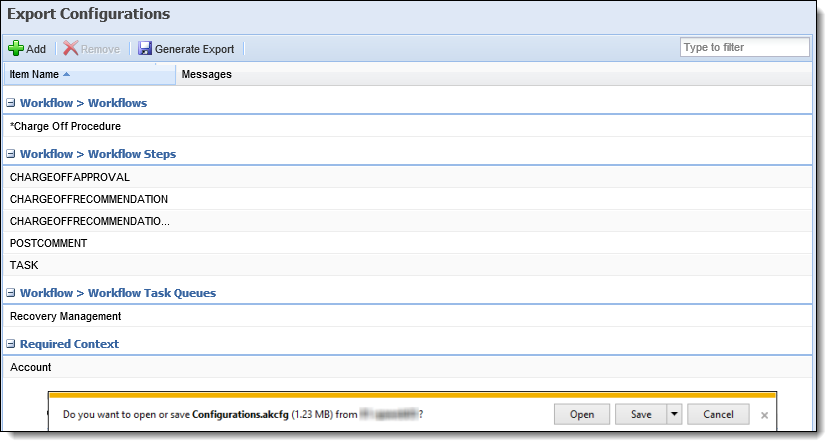
The Charge Off workflow is displayed on the Export Configurations page along with all of the associated workflow steps. She clicks  and is prompted to save the Configurations file.
She saves the Configuration file on her local machine then logs in to the production system to upload the export package. Lois browses to System Management > Configurations > Import Configurations and clicks  .
.
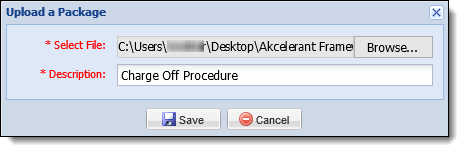
In the Upload a Package window, Lois clicks Browse to browse to the location of the file to import and provides a description of the file so its purpose is clear. She clicks  and the package is added to the Awaiting Import list.
Next, Lois notifies her IT resource, Peter, to run the import process on the production Lifecycle Management Suite web/app server. Peter waits until the close of business that night to run the import process and informs Lois the next morning that the Charge Off workflowhas been successfully loaded into production.
In order to configure and run an Import or Export, permissions must be granted for each user or security group. To assign permissions for Configuration Manager:
 .
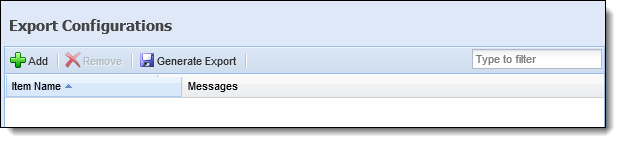
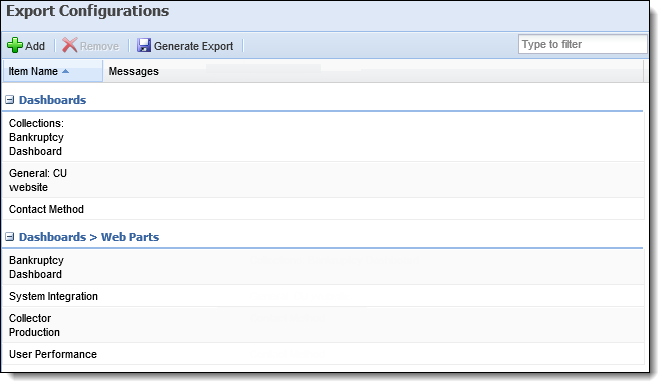
.The Export Configurations page can be accessed from System Management > Configurations > Export Configurations to provide system administrators with the ability to configure the items for export through Configuration Manager.
This page displays information about the Export items added to Configuration Manger within the following columns:
| Column | Description |
| Item Name | Displays the name of the Export Item. |
| Messages | Displays any informational messages related to the item. |
From the Export Configurations page, system administrators can perform the following actions:
| Button | Description | ||
 |
Click this button to add a new item to the export. |
||
 |
Click this button to remove an item from the export.
|
||
 |
Click this button when finished adding items to export. This generates the export package. | ||
| Filter | Use this box to filter items in the list for export. Any text can be entered to narrow down the items displayed on the page. |
This section provides an overview of the following information to assist system administrators in configuring items for export using Configuration Manager:
The following components are defined for each Export Item added to Configuration Manager:
|
The items that are displayed in the Add Export Items window are dependent on the solution that is active. For example, if loan origination is not active in the Lifecycle Management Suite, loan origination items do not appear in the list of Item Types or Available/Assigned items. |
| Component | Description | ||
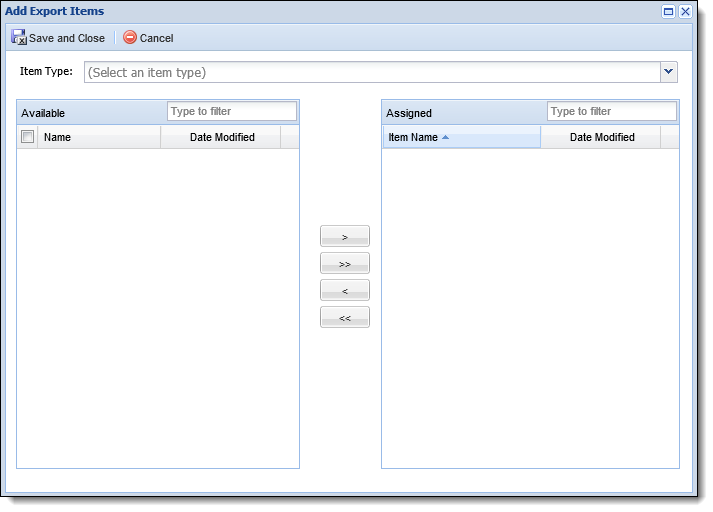
| Item Type |
Displays a drop-down list of all available Lifecycle Management Suite functionality that can be exported from the source environment.
|
||
| Available Box |
Displays the items available to add to the export package. Assign export items to the package by selecting the desired item(s) from the list and moving to the Assigned box using the arrows that display.
|
||
| Assigned Box | Displays the items that have been assigned for export. |
 |
If connector-specific items are being exported, ensure that the connector is activated and properly configured in the source and target environment prior to exporting and importing. If the connector is not activated in the target system, the connector-specific items, such as workflow steps, do not function correctly. |
|
User permissions in the custom range (NCCI) are ignored by Configuration Manager. These permissions are not deleted in the target system when a user is exported and imported via configuration manager because they are not included in the import file. If they are deleted, they will be lost. NCCI permissions need to be completely managed outside of Configuration Manager. |
The Add function provides the ability to define the functionality items to be exported through Configuration Manager as well as assign additional items to be included as part of the export.
To add an Export item, click within the top of the Export Configurations page.
The Add Export Item window appears:
Assign all Export Components. Once all components are assigned, click .
The added functionality items appear on the Export Configurations page, along with any additional items that are included as part of the export. The Export Items are organized in groups based on the Item Type selected. In the example below, the System Integration web part is a part of the CU Website dashboard being exported and all of the Web Parts are grouped together under the Dashboards > Web Parts heading.
|
The number of groups displayed varies based on the functionality items chosen for export. One functionality item may have many groups of additional items. |
When finished configuring the Export, click . See the Generating an Export section below for more information.
|
Required relationships, or items that must be exported with a functionality item, cannot be removed. |
. is clicked, the export item is deleted from the list..
The file path cannot contain a dot (.). The import into the target system cannot process a file that has a dot in the file path location (C:\Framework.Default, for example).
The generated file is always named Configurations.akcfg. To create multiple export packages, rename the file without changing the “.akcfg” extension, so the original files are not overwritten.
If the Configurations.akcfg file is renamed, the extension cannot be changed; it must remain “.akcfg.” If this is changed, the import package cannot be successfully loaded to the Lifecycle Management Suite on the Configuration Manager Import screen.
Back to Export Configurations ^
The following table outlines each Item Type available when configuring an export and the related items that get configured in the package.
Related Items are defined as the components of the Item that are necessary to include in the package so the Item can function as intended in the target environment. With some items, only the relationship to the related item is included in the package. For example, the relationship between the Users assigned to an Area are included in the package. The actual Users and all of their Related Items are not included in the package with the Area, unless the Users Item Type is selected for export. For this reason it is important that the databases in the source and target environments are in sync so the correct and required Users exist prior to starting Configuration Manager work.
| Item Type | Database Table | Related Item - Database | Related Item in the Lifecycle Management Suite | ||
| Account Types | tblAccountType | tblWorkflowAccountType | The general settings, assigned screens, and Account Mappings configured for the Account Type in System Management > Account Types. | ||
| Address Book > Companies | tblCompany | tblCompanyTypeMapping | The general settings, Contacts, and Documents configured for the Company in System Management > Address Book > Companies. | ||
| Address Book > Contacts | tblContacts | tblCompany | The general settings configured for the Contact in System Management > Address Book > Contacts. | ||
| Areas | tblArea |
tblCategoryMapping tblAreaGroup tblAreaUser tblWorkflowArea tblAreaHyperlink tblAreaScreen Core.Screen |
The general settings, Assigned Users and Groups, Screens, Workflows, Categories, and Rules configured for the Area in System Management > Areas. | ||
| Case Types | tblCaseType |
tblScreenCaseType tblWorkflowCaseType Core.TaskProcessDefinitionMap Core.TaskQueue Core.TaskDefinitionMap |
The general settings, Screens, Case Processes, and Case Tasks configured and assigned to the Case Type in System Management > Collections > Case Types. | ||
| Categories | tblCategory | tblCategoryMapping |
The general settings, Areas, Workflows, Dashboards, Views, Reports, Reasons, Screens, and assigned Users configured for the Category in System Management > Categories. |
||
| Collections > Collection Queues | tblQueue |
tblPerfGroup Core.CustomField tblInterfaceQueue tblQueueGroup tblQueueUser tblQueueRuleGroup |
The general settings, Criteria, Sorting, Assigned Users, and Assigned Groups configured for the Collection Queue in System Management > Collections > Collection Queues.
|
||
| Collections > Case Processes | Core.TaskProcessDefinition |
Core.WorkdaySchedule Core.TaskDefinition Core.TaskProcessDefinitionMap |
The general settings, Tasks and Assigned Case Types configured for the Case Process in System Management > Collections > Case Processes. | ||
| Collections > Case Queues | Core.TaskQueue |
Core.TaskQueueGroup Core.TaskQueueUser tblLookup |
The general settings, Assigned Users, and Assigned Groups configured for the Case Queue in System Management > Collections > Case Queues, as well as the department assigned to the case queue and configured in System Management > Field Configurations. | ||
| Collections > Case Tasks | Core.TaskDefinition |
Core.TaskDefinitionProperty Core.TaskQueue Core.TaskResultDefinition Core.TaskEscalationDefinition Core.TaskDefinitionMap Core.WorkdaySchedule |
The general settings, Instructions, Assigned Case Types, Escalation, and Results configured for the Case Task in System Management > Collections > Case Task. | ||
| Collections > Event Processing | Core.EventPair |
Core.DelayedEvent Core.DelayedEventPair Core.EventPairAction Core.EventPairEvent Core.EventPairRuleElement
|
The general settings, including any time delay configurations, as well as the Event(s), Action(s), and Rules configured for the Event process in System Management > Collections > Event Processing. | ||
| Collections > Screens | Core.Screen |
Core.ScreenType Core.ScreenPanelEditScreen Core.ScreenPanel Core.ScreenRuleElement tblAreaScreen Core.Screen Core.ScreenGroup Core.ScreenUser Core.ScreenItem Core.ScreenInteraction |
The general settings, Panels, Buttons, Interactions, Assigned Account Types, Assigned Areas, Assigned Users, and Groups configured for the Screen in System Management > Screens. | ||
| Communication > Emails | tblEmail |
tblEmailField Core.CommunicationRoleType |
The general settings, Assigned Roles, and design configured for the Email in System Management > Communication > Emails. | ||
| Communication > Letters and Forms | tblLetterType | tblLetter | The general settings, Criteria, and Assigned Roles configured for the Letter in System Management > Communication > Letters and Forms. | ||
| Cost Centers | tblChargeOffCostCenter | The settings configured for the Cost Center in System Management > Cost Centers. | |||
| Custom Fields | Core.CustomField | tblLookupType |
The settings configured for the Custom Field in System Management > Custom Fields.
|
||
| Dashboards | tblDashboard |
tblDashboardDetail tblCategoryMapping tblDashboardGroup tblDashboardUser |
The general settings, Design, Assigned Categories, Assigned Users, and Assigned Groups configured for the Dashboard in Dashboards on the Ribbon.
|
||
| Dialers > Dialer Return Codes | tblReleaseCode | tblWorkflow | The settings configured for the Dialer Return Code in System Management > Dialers > Dialer Return Codes. | ||
| Exports | tblInterfaceProfile |
tblInterfaceSubType tblInterfaceField tblInterfaceBaseType tblInterfaceQueue tblRuleGroup |
The General settings, File Details Fields, Schedule, and Criteria configured for the Export in System Management > Exports. | ||
| Field Configurations | tblLookupType | The Lookup Values configured for the Lookup in System Management > Field Configurations. | |||
| GL Accounts | tblGeneralLedger |
tblChargeOffTransactionCodePostingRule tblGLGroup tblGLUser |
The general settings, Assigned Users, and Assigned Groups configured for the GL Account in System Management > GL Accounts. | ||
| Groups > Performance Groups | tblPerfGroup | tblUserPerfGroup | The general settings, Assigned Users, and Assigned Queues configured for the Performance Group in System Management > Groups > Performance Groups. | ||
| Groups > Security Groups | tblGroup |
tblGLGroup tblGLUser tblQueueGroup tblChargeOffTransactionCodeGroup Lending.QueueGroup Core.ScreenGroup Lending.AccountRestrictionGroup Lending.ApplicationSourceGroup Core.TaskQueueGroup tblDashboardGroup tblViewGroup tblWorkflowGroup tblReportGroup tblUserGroup tblAreaGroup tblTaskQueueGroup |
The general settings, Permissions, Assigned Users, Assigned Screens, Assigned Workflows, Assigned Dashboards, Assigned Views, Assigned Reports, and Assigned Areas and Lending Settings configured for the Security Group in System Management > Groups > Security Groups. | ||
| Hyperlinks | tblHyperlink | tblAreaHyperlink | The general settings and Assigned Areas configured for the Hyperlink in System Management > Hyperlinks. | ||
| Interest Rates | tblChargeOffInterestRateType | tblChargeOffInterestRate | The Summary and Rates configured for the Interest Rate in System Management > Interest Rates. | ||
| Lookup | tblLookup |
tblLookupType Lending.VendorType tblCompanyTypeMapping Lending.ApplicationSourceGroup Lending.ApplicationSourceUser Lending.AccountRestrictionUser Lending.AccountRestrictionGroup |
The Lookup Values configured for the Lookup in System Management > Lookups. | ||
| Payment Types | tblPaymentType | The settings configured for the Payment Type in System Management > Payment Types. | |||
| Reports | tblReport |
tblReportGroup tblCategoryMapping tblUserReport tblReportRuleGroup tblReportField File |
The Define settings, Fields, Criteria, Schedule, Assigned Users, Assigned Groups, and Assigned Categories configured for the Report in Reports on the Ribbon. | ||
| Role Types | Core.RoleType | Core.CommunicationRoleType | The settings configured for the Role Type in System Management > Role Types. | ||
| Share Types | tblShareType | The settings configured for the Share Type in System Management > Share Types. | |||
| Transaction Codes | tblChargeOffTransactionCode | tblChargeOffTransactionCodeGroup tblChargeOffTransactionCodeUser tblChargeOffTransactionCodePostingRule |
The general settings, Posting Rules, Assigned Users, and Assigned Groups configured for the Transaction Code in System Management > Transaction Codes. | ||
| Users | tblUser |
tblTaskQueueUser tblGLUser Lending.QueueUser Core.ScreenUser Lending.ApplicationSourceUser Lending.AccountRestrictionUser tblOrgUser tblUserFunction tblWorkflowUser tblUserReport tblUserPerfGroup Core.TaskQueueUser tblDashboardUser tblUserGroup tblCategoryMapping tblAreaUser |
The User Information, Company Information, Personal Information, Collection Settings, Assigned Security Groups, Permissions, Assigned Collections Screens, Assigned Lending Screens, Assigned Workflows, Assigned Dashboards, Assigned Views, Assigned Reports, Assigned Areas, Assigned Categories, and Restrictions and Lending Settings configured for the User in System Management > Users.
|
||
| Views | tblView |
tblCategoryMapping tblViewGroup tblViewField tblView tblRuleGroup |
The general settings, Fields, Criteria, Assigned Users, Assigned Groups, Assigned Categories, and Charts configured for the View in Views on the Ribbon.
|
||
| Workday Schedules | Core.WorkdaySchedule | Core.WorkdayScheduleCalendar | The Schedule settings and Days configured for the Workday Schedule in System Management > Workday Schedules. | ||
| Workflow > Workflow Reason Codes | tblReasonCode | tblCategoryMapping | The general settings and Assigned Categories configured for the Workflow Reason Code in System Management > Workflow > Workflow Reason Codes. | ||
| Workflow > Workflow Task Queues | tblTaskQueue |
tblTaskQueueGroup |
The general settings, Assigned Users, and Assigned Groups configured for the Task Queue in System Management > Workflow > Workflow Queues. | ||
| Workflow > Workflows | tblWorkflow | tblWorkflowUser tblWorkflowAccountType tblWorkflowCaseType tblWorkflowGroup tblCategoryMapping tblWorkflowArea tblReleaseCode tblWorkflowStep |
The general settings, Design, Assigned Account Types, Assigned Case Types, Assigned Users, Assigned Groups, Assigned Categories, Assigned Areas, Fields, and Solutions configured for the Workflow in System Management > Workflow > Workflows. |
All rules associated with an Item are always included in the package because they are necessary for the Item to function in the target environment. Once imported into the target environment, they automatically function as they did in the source.
Additionally, all Categories in the Rule Application are included in Configuration Manager. Administrators can configure an export to include individual rules by choosing the Rules > Accountservicing > Category and assigning the desired rule(s) to the export configuration.
Back to Export Configurations ^
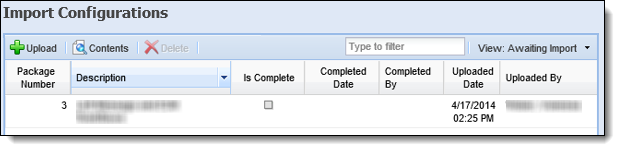
The Import Configurations page can be accessed from System Management > Configurations > Import Configurations to provide system administrators with the ability to upload the items for import through Configuration Manager.

This page displays information about each Import package within the following columns:
| Column | Description |
| Package Number | Displays the next sequential number for all uploaded packages. |
| Description | Displays the description entered when the package was uploaded. |
| Is Complete | Displays a  when the package has been imported. This column is blank when the package has not been imported. when the package has been imported. This column is blank when the package has not been imported. |
| Completed Date | Displays the date that the import was completed. |
| Completed By | Displays the name of the user who completed the import. |
| Uploaded Date | Displays the date that the Import package was uploaded. |
| Uploaded By | Displays the name of the user who uploaded the Import package. |
From the Import Configurations page, system administrators can perform the following actions:
| Button | Description |
 |
Click this button to add a new package for import. |
 |
Click this button to view the items included in the package. |
 |
Click this button to remove an import from the list. |
| Filter Box | Use this box to filter the imports in the list by description. Any text can be entered to narrow down the items displayed on the page. |
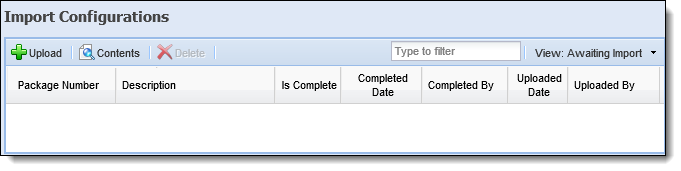
The default view of the Import Configurations page is Awaiting Import, which lists all of the packages that have yet to be imported. When first using the Configuration Manager feature, this list is empty. To change the view, click the View drop-down. Select All to show all packages or Import Complete to view package imports that have been completed.

To begin the Import process, click  .
.
The Upload a Package window appears. Click Browse to browse to the location of the file to import and provide a description of the file so its purpose is clear.
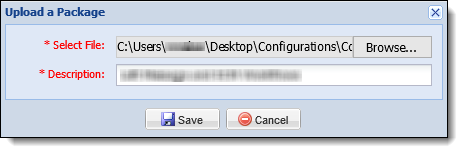
Once the file has been identified, click  .
.
The package is added to the Awaiting Import list.
To complete the import, contact an IT resource to run the import process on the server.
|
A package remains in the Awaiting Import list until it is imported or deleted. For more information on removing an import item from the list, please see Deleting Import Items. |
 Running the Import Process on the Server
|
Because this process makes changes to the target database, this should only ever be executed off-hours. A backup of the database should be taken immediately before running the import. |
To run the import process, log on to the Lifecycle Management Suite web/app server and locate Server Manager (“Akcelerant.ConfigurationManager.exe”) located in the C:\Configuration folder. Right-click on the exe and select Run as Administrator. When Server Manager opens, click Configuration Management in the menu on the left.
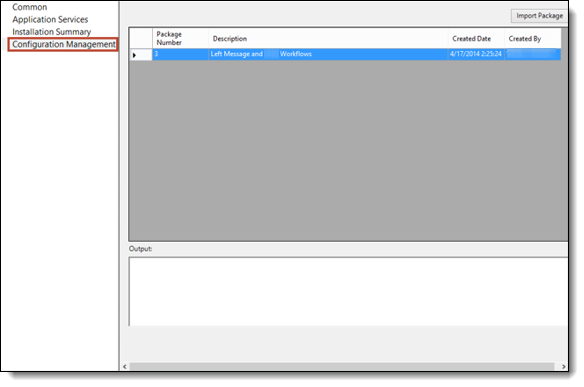
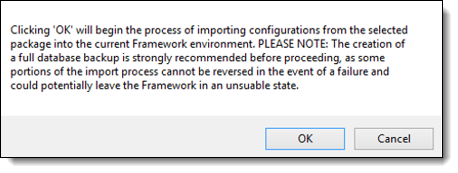
Click to highlight the package to import and click the Import Package button. A prompt appears confirming that the import is ready to be run. Click OK.
The Output window provides a running log of the status of the import.
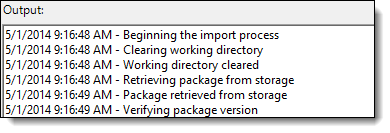
Once the import is finished, a message appears stating the success or failure of the import. The following message appears if the import is successful:
The following message appears if the import is unsuccessful:
The log specifically states the issue with the import. Please see the Troubleshooting section of this topic for more information regarding common causes of import failure.
The import consists of different stages, as different types of items each require their own method of updating the target system. The import process takes snapshots of the database at each stage so if an error does occur, the import can roll back from the stage that caused the error instead of having to roll back the whole import. While this ensures the target system is not left in a compromised state, it is still strongly advised for the institution to make their own database backup as a guaranteed protection against catastrophic failure.
|
All items except custom fields that have already been created are rolled back in the event of a failure. |
|
Please contact Temenos Customer Care, prior to restoring the database, if the import fails. Customer Care can assist with troubleshooting and resolving any failure issues. |
Upon completion of the Import process, the import package is removed from the Awaiting Import list on the Import Configurations page in the Lifecycle Management Suite. It can now be found on the Import Complete list.
The import process is now complete and all configurations from the source environment are available in the target environment.
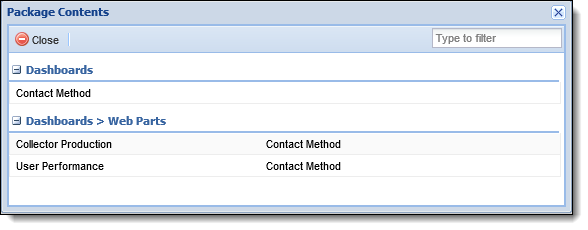
The View Contents function enables administrators to see a list of all entities included in the Import package.
 .
. to return to the Import Configurations page..
Because an import can happen at any time and may be bi-directional, it is important to record and track in the database where items came from. A Source Globally Unique Identifier field (Source GUID) is added to all database tables that are capable of copying data, so a source is easily identifiable. After taking a copy of the source database and restoring it in the target environment, all items have matching Source GUIDs. Any changes made in the source and exported to the target find the matching Source GUID and overwrite that item in the target environment. This overwrites the existing configuration of that item in the target environment.
For example, a workflow originally called “Charge Off” in both the source and target environments is renamed to “Charged Off Status” in the source environment. When imported into the target environment, it overwrites the “Charge Off” workflow to “Charged Off Status,” as it has the same Source GUID.
Deleting an item in one environment and creating a new item with the same name to replace it does not work since a unique Source GUID is created in the database, which will cause an issue with the import.
For more information on Source GUIDs, please see the Unique Names/Values That Cause an Import to Fail section of this topic.
|
Source GUIDs only exist in the database; they are never visible from the application. |
Imported items can also be identified by the system User Id (-10) and a date and time of creation of the export package. Normally when changes are made in the Lifecycle Management Suite, the User Id of the person who made the change is recorded.
The following table outlines the stages of processing that occur during an import into the target environment and the rollbacks that can occur at each stage.
| Stage of Import | Title of Stage | Details | ||
| 1 | Initialization Processing |
Upon launching Server Manager and selecting the package to import on the Configuration Management screen, the following actions are performed:
If all of these actions are successful, the import continues to stage 2. If an action fails, the import rolls back and a failure message is returned in the log displayed on the Configuration Management screen in Server Manager. |
||
| 2 | Initial Rule Application Operations |
For each rule application included in the package, the import performs the following actions:
If all of these actions are successful, the import continues to stage 3. If an action fails, the import rolls back and a failure message is returned in the log displayed on the Configuration Management screen in Server Manager. |
||
| 3 | Backup Items Based on the Operations That Need to be Completed |
For items included in the package, the import performs the following actions:
If all of these actions are successful, the import continues to stage 4. If an action fails, the import rolls back and a failure message is returned in the log displayed on the Configuration Management screen in Server Manager. |
||
| 4 | Database Operations |
The import performs the following actions:
If all of these actions are successful, the import continues to stage 5. If an action fails, the import rolls back and a failure message is returned in the log displayed on the Configuration Management screen in Server Manager. |
||
| 5 | Custom Field Operations |
The import performs the following actions:
If all of these actions are successful, the import continues to stage 6. If an action fails, the import rolls back and a failure message is returned in the log displayed on the Configuration Management screen in Server Manager.
|
||
| 6 | Secondary Rule Application Operations |
For each rule application included in the package, the import performs the following actions:
If all of these actions are successful, the import continues to stage 7. If an action fails, the import rolls back and a failure message is returned in the log displayed on the Configuration Management screen in Server Manager. |
||
| 7 | Import Files |
The import performs the following actions:
If all of these actions are successful, the import continues to stage 8. If an action fails, the import rolls back and a failure message is returned in the log displayed on the Configuration Management screen in Server Manager. |
||
| 8 | Import Cleanup/Commit/Finalization |
The import performs the following actions:
If all eight stages are successful, an import success message is returned in the log displayed on the Configuration Management screen in Server Manager. If an action fails, an import failure message is returned in the log. |
The following actions are performed during each import rollback:
If all of these actions are successful, a rollback success message is returned in the log displayed on the Configuration Management screen in Server Manager. If an action fails, rollback processing is aborted and a failure message is returned in the log.
The following section provides system administrators assistance in troubleshooting some common issues that can result in import failure:
If any of the below fields are sent from the source system to the target system with the same name but a different Source GUID in the target database, the import will fail.
For example, if the source (test) and target (production) environments are identical and an item is deleted from test then rebuilt with the exact same information, the Lifecycle Management Suite creates a new database record with a different Source GUID. There are no problems exporting the item, but when importing it, the import fails because there is an item with the same name and a different Source GUID.
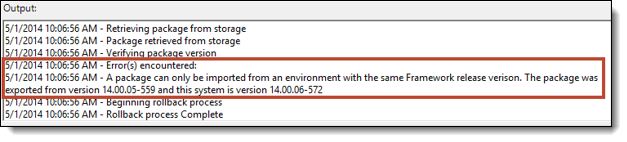
If the import fails for this reason, an error similar to the following is received in the log:

To resolve this error, change the name of the item in the source environment prior to importing into the target environment.
| If Configuring this Item | This Value Must be Unique | Path to Lifecycle Management Suite Functionality |
| Account Type | Account Type Code | System Management > Account Types |
| Area | Area Name | System Management > Areas |
| Branch | Branch Code | System Management > Branches |
| Case Process Definition | Name | System Management > Collections > Case Processes |
| Case Task | Name | System Management > Collections > Case Tasks |
| Case Type | Case Type Name | System Management > Case Types |
| Category | Category Name | System Management > Categories |
| Charge Off Cost Center | Title | System Management > Cost Centers |
| Charge Off Interest Rate Type | Type | System Management > Interest Rates |
| Charge Off Transaction Code |
Title
Charge Off Transaction Code |
System Management > Transaction Codes |
| Company |
Company Name
Company Code |
System Management > Address Book > Companies |
| Dashboard | Dashboard Name | Ribbon > Dashboards Icon |
| Email Name | System Management > Communication > Emails | |
| General Ledger |
Account Number
Account Title Fully Qualified Account Number |
System Management > GL Accounts |
| Group | Group Name | System Management > Groups > Performance Groups and System Management > Groups > Security Groups |
| Hyperlink | Hyperlink Name | System Management > Hyperlinks |
| Letter Type | Letter Type Code | System Management > Communication > Letters and Forms |
| Lookup Type | Lookup Type | System Management > Field Configurations > System Lookups |
| Meta Data | Field Label | System Management > Screens |
| Payment Type | Payment Type Code | System Management > Payment Types |
| Performance Group | Performance Group Name | System Management > Groups > Performance Groups |
| Queue | Queue Name | System Management > Collections > Collection Queues |
| Release Code | Release Code Name | System Management > Dialers > Dialer Return Codes |
| Report | Report Name | Ribbon > Reports Icon |
| Role Type | Role | System Management > Role Types |
| Screen | Name | System Management > Screens |
| Service Ticket Type | Name | System Management > Service > Service Ticket Type |
| Case Queue | Name | System Management > Collections > Case Queues |
| User | Username | System Management > Users |
| View | View Name | Ribbon > Views Icon |
| Workday Schedule | Schedule Name | System Management > Workday Schedules |
| Workflow | Name | System Management > Workflow > Workflows |
| Workflow Step Work Type | Code | System Management > Workflow > Workflow Steps |
A common cause of import failure is the source and target environments being on different versions of the Lifecycle Management Suite.
Resolution: To correct this issue, a backup of the target (production) environment needs to be restored in the source (test) environment. The source Lifecycle Management Suite then needs to be reconfigured and the export needs to be re-run.
Another common cause of import failure is Source GUIDs (unique identifiers of each item in the database) not matching between environments.
Example: For example, when a database backup is taken from production and restored to test, the Source GUIDs are identical because the database is the same in both environments. If a custom field was then deleted from the test environment and recreated in the test environment and exported to production, the import would fail because the Source GUID for that custom field is now different, because it was assigned a new one during the recreation.
Resolution: To prevent this issue, ensure Configuration Manager users are not deleting and re-creating items that previously existed in the database backup.
A cause of failure is if a functionality item has been selected to export that has an assigned rule that no longer exists in the rule app.
Example: For example, a workflow is configured with a rule that has been deleted. An error, stating the item (workflow) needs to be resaved, is received when trying to add the workflow to the export, preventing the export package from being created.
Resolution: To correct this issue, open and resave the functionality item (the workflow in the above example) in the Lifecycle Management Suite. The functionality item needs to be resaved to remove the reference to the rule that no longer exists. Be aware of other pieces of configurations in the entity that have rules associated with them that could have been deleted.